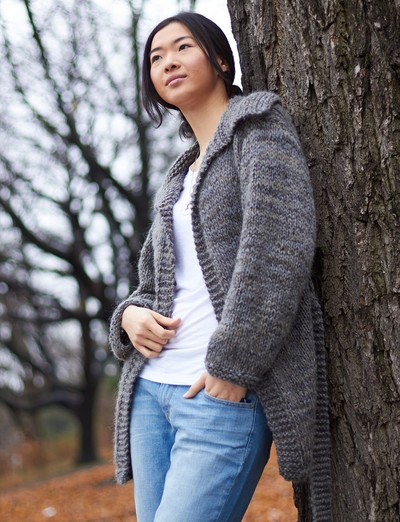
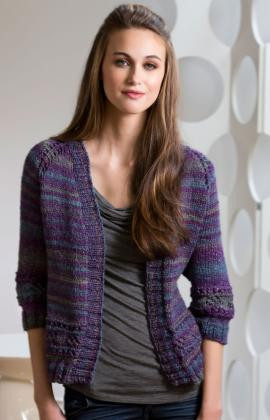
Leisure Luxe Cardigan

Slow things down a bit in the Leisure Luxe Cardigan. This delightfully textured knit cardigan pattern features a flattering shape and drape for those who crave comfort and style in the same garment. This intermediate knitting pattern is perfect for variable autumn weather and lends itself nicely to the layered look. Sure to be the prized possession of your weekend wardrobe, the Leisure Luxe Cardigan proves that you don't have to sacrifice fashion for coziness.

Knitting Needle Size6 or 4 mm, 7 or 4.5 mm
Yarn Weight(4) Medium Weight/Worsted Weight and Aran (16-20 stitches to 4 inches)
Gauge20 sts and 26 rows = 4" [10 cm] with larger needles in stocking st.
Materials:
- Patons Classic Wool Worsted (100 g/3.5 oz;192 m/210 yds)
- Sizes: XS, S, M, L, XL, 2/3 XL, 4/5 XL - 7, 7, 7, 8, 8, 9, 9, balls
- Sizes 4 mm (U.S. 6) and 4.5 mm (U.S. 7) knitting needles or size needed to obtain tension
- Cable needle
MEASUREMENTS
To fit bust measurement
XS 28-34" [ 71-86.5 cm ]
S 28-34" [ 71-86.5 cm ]
M 36-38" [ 91.5-96.5 cm ]
L 40-42" [ 101.5-106.5 cm ]
XL 44-46" [ 112-117 cm ]
2/3 Extra Large 48-54" [ 122-137 cm ]
4/5 Extra Large 56-62" [ 142-157.5 cm ]
Finished bust
XS 36" [ 91.5 cm ]
S 36" [ 91.5 cm ]
M 40" [ 101.5 cm ]
L 44½" [ 113 cm ]
XL 50" [ 127 cm ]
2/3 Extra Large 56" [ 142 cm ]
4/5 Extra Large 65" [ 165 cm ]
ABBREVIATIONS
Beg = beginning
K = knit
P = purl
pat = pattern
psso = pass slipped stitch over
rem = remain(ing)
rep = repeat
Rnd = Round
RS = right side
sc = single crochet
Sl st = Slip stitch
sp(s) = space(s)
st(s) = stitch(es)
tog = together
WS = wrong side
2tog = Work K2tog or P2tog as appropriate.
Alt = Alternate(ing).
Approx = Approximately.
C4B = Slip next 2 stitches onto a cable needle and leave at back of work. K2, then K2 from cable needle.
C4F = Slip next 2 stitches onto a cable needle and leave at front of work. K2, then K2 from cable needle.
Cont = Continue(ity).
Dec = Decrease(ing).
Inc = Increase 1 stitch by knitting into front and back of next stitch.
K2tog = Knit next 2 stitches together.
P2tog = Purl next 2 stitches together.
Pat = Pattern.
Sl1 = Slip next stitch knitwise.
T3B = Slip next stitch onto a cable needle and leave at back of work. K2, then P1 from cable needle.
T3F = Slip next 2 stitches onto a cable needle and leave at front of work. P1, then K2 from cable needle.
INSTRUCTIONS
The instructions are written for smallest size. If changes are necessary for larger sizes the instructions will be written thus ( ). Numbers for each size are shown in the same color throughout the pattern. When only one number is given in black, it applies to all sizes.
Panel Pat A (worked over 7 sts). (See chart)
1st row: (RS). K1. P1. K4. P1.
2nd and alt rows: K1. P4. K1. P1.
3rd row: K1. P1. C4B. P1.
5th, 7th, 9th and 11th rows: As 1st row.
12th row: As 2nd row.
These 12 rows form Panel Pat A.
Panel Pat B (worked over 7 sts). (See chart)
1st row: (RS). K1. P1. K4. P1.
2nd and alt rows: K1. P4. K1. P1.
3rd row: K1. P1. C4F. P1.
5th, 7th, 9th and 11th rows: As 1st row.
12th row: As 2nd row.
These 12 rows form Panel Pat B.
Panel Pat C (worked over 20 sts). (See chart)
1st row: (RS). (P2. T3B. T3F. P2) twice.
2nd and alt rows: Knit all knit sts and purl all purl sts as they appear.
3rd row: (P1. T3B. P2. T3F. P1) twice.
5th row: (T3B. P4. T3F) twice.
7th row: (T3F. P4. T3B) twice.
9th row: (P1. T3F. P2. T3B. P1) twice.
11th row: (P2. T3F. T3B. P2) twice.
12th row: As 2nd row.
These 12 rows form Panel Pat C.
BACK
With smaller needles, cast on 93 (107-113-121-141-169) sts.
1st row: (RS). K1. *P1. K1. Rep from * to end of row.
2nd row: P1. *K1. P1. Rep from * to end of row.
Rep last 2 rows (K1. P1) ribbing 3 times more, ending with a 2nd row and inc 8 (8-9-8-9-9) sts evenly across last row. 101 (115-122-129-150-178) sts.
Change to larger needles and proceed in pat as follows:
1st row: (RS). P1. *Work 1st row of Panel Pat A. Rep from * to last 2 sts. K1. P1.
2nd row: K1. P1. *Work 2nd row of Panel Pat A. Rep from * to last st. K1.
3rd row: P1. *Work 3rd row of Panel Pat A. Rep from * to last 2 sts. K1. P1.
4th row: K1. P1. *Work 4th row of Panel Pat A. Rep from * to last st. K1.
Panel Pat A is now in position.
Cont in pat until work from beg measures 18" [45.5 cm], ending with a WS row.
Shape armholes: Keeping cont of pat, cast off 7 (7-7-7-14-14) sts beg next 2 rows. 87 (101-108-115-122-150) sts rem.
Cont even in pat until armhole measures 8½ (9-9½-9½-10-10½)" [21.5 (23-24-24-25.5-26.5) cm], ending with a WS row.
Shape back neck: 1st row: (RS). Pat across 21 (21-25-28-28-33) sts. Turn. Leave rem sts on a spare needle.
2nd row: Work 2tog. Pat to end of row.
3rd row: Pat to last 2 sts. Work 2tog.
4th row: As 2nd row. 18 (18-22-25-25-30) sts rem.
5th row: Work even in pat. Cast off.
With RS of work facing, join yarn to rem sts and cast off 45 (59-58-59-66-84) sts. Pat to end of row.
2nd row: Pat to last 2 sts. Work 2tog.
3rd row: Work 2tog. Pat to end of row.
4th row: As 2nd row. 18 (18-22-25-25-30) sts rem.
5th row: Work even in pat. Cast off.
LEFT FRONT
**With smaller needles, cast on 59 (65-73-79-85-99) sts.
Work 8 rows in (K1. P1) ribbing as given for Back, ending with a 2nd row and inc 3 (4-3-4-5-5) sts evenly across last row. 62 (69-76-83-90-104) sts.**
Change to larger needles and proceed in pat as follows:
1st row: (RS). P1. *Work 1st row of Panel Pat A.Rep from * to last 26 sts. K1. P1. Work 1st row of Panel Pat C. (P1. K1) twice.
2nd row: Sl1. K1. P1. K1. Work 2nd row of Panel Pat C. K1. P1. *Work 2nd row of Panel Pat A. Rep from * to last st. K1.
3rd row: P1. *Work 3rd row of Panel Pat A. Rep from * to last 26 sts. K1. P1. Work 3rd row of Panel Pat C. (P1. K1) twice.
4th row: Sl1. K1. P1. K1. Work 4th row of Panel Pat C. K1. P1. *Work 4th row of Panel Pat A. Rep from * to last st. K1.
Panel Pats A and C are now in position.
Cont in pat until work from beg measures 18" [45.5 cm], ending with a WS row.
Shape armhole and V-neck: 1st row: (RS).
Cast off 7 (7-7-7-14-14) sts. Pat to last 26 sts. P2tog. Pat to end of row. 54 (61-68-75-75-89) sts rem.
Sizes M, L, XL, 2/3XL and 4/5XL only: Next row: (WS). Work even in pat.
Next row: Pat to last 26 sts. P2tog. Pat to end of row.
Rep last 2 rows (5-12-22-22-34) times more. (55-55-52-52 -54) sts rem.
Sizes XS/S, M, L, XL and 2/3XL only: Work 3 rows even in pat.
Next row: (RS). Pat to last 26 sts. P2tog. Pat to end of row.
Rep last 4 rows 7 (12-8-3-3) times more. 46 (42-46-48-48) sts rem.
Size XS/S only: Cont in same manner, dec 1 st at V-neck edge on every following 6th row from previous dec to 42 sts.
All sizes: Cont even in pat until armhole measures same length as Back before shoulder, ending with a WS row.
Next row: Cast off 18 (18-22-24-24-30) sts. Pat to end of row. 24 sts rem.
Cont in pat on rem 24 sts, until work from shoulder measures length to fit along back neck edge to center of back, ending with a WS row. Cast off.
RIGHT FRONT
Work from ** to ** as given for Left Front.
Change to larger needles and proceed in pat as follows:
1st row: (RS). Sl1. P1. K1. P1. Work 1st row of Panel Pat C. P1. *Work 1st row of Panel Pat B. Rep from * to last 2 sts. K1. P1.
2nd row: K1. P1. *Work 2nd row of Panel Pat B. Rep from * to last 25 sts. K1. Work 2nd row of Panel Pat C. (K1. P1) twice.
3rd row: Sl1. P1. K1. P1. Work 3rd row of Panel Pat C. P1. *Work 3rd row of Panel Pat B. Rep from * to last 2 sts. K1. P1.
4th row: K1. P1. *Work 4th row of Panel Pat B. Rep from * to last 25 sts. K1. Work 4th row of Panel Pat C. (K1. P1) twice.
Panel Pats B and C are now in position.
Cont in pat until work from beg measures 18" [45.5 cm], ending with a RS row.
Shape armhole and V-neck: 1st row: (WS). Cast off 7 (7-7-7-14-14) sts. Pat to end of row. 55 (62-69-76-76-90) sts rem.
Sizes M, L, XL, 2/3XL and 4/5XL only: Next row: Pat across 24 sts. P2tog. Pat to end of row.
Next row: (WS). Work even in pat.
Rep last 2 rows (6-13-23-23-35) times more. (55-55-52-52-54) sts rem.
Sizes XS/S, M, L, XL and 2/3XL only: Work 2 rows even.
Next row: (RS). Pat across 24 sts. P2tog. Pat to end of row.
Work 3 rows even in pat.
Rep last 4 rows 8 (12-8-3-3) times more. 46 (42-46-48-48) sts rem.
Size XS/S only: Cont in same manner, dec 1 st at V-neck edge on every following 6th row from previous dec to 42 sts.
All sizes: Cont even in pat until armhole
measures same length as Back before shoulder, ending with a RS row.
Next row: Cast off 18 (18-22-24-24-30) sts. Pat to end of row. 24 sts rem.
Cont in pat on rem 24 sts, until work from shoulder measures length to fit along back neck edge to center of back, ending with a WS row. Cast off.
SLEEVES
With smaller needles, cast on 91 (99-101-101-107-113) sts.
Work 4 rows in (K1. P1) ribbing as given for Back, ending with a 2nd row and inc 3 sts evenly across last row. 94 (102-104-104-110-116) sts.
Change to larger needles and proceed in pat as follows:
1st row: (RS). P7 (1-2-2-5-8). (Work 1st row of Panel Pat C) 4 (5-5-5-5-5) times. P7 (1-2-2-5-8).
2nd row: K7 (1-2-2-5-8). (Work 2nd row of Panel Pat C) 4 (5-5-5-5-5) times. K7 (1-2-2-5-8).
3rd row: P7 (1-2-2-5-8). (Work 3rd row of Panel Pat C) 4 (5-5-5-5-5) times. P7 (1-2-2-5-8).
4th row: K7 (1-2-2-5-8). (Work 4th row of Panel Pat C) 4 (5-5-5-5-5) times. K7 (1-2-2-5-8). Panel Pat C is now in position.
Cont in pat until work from beg measures 10" [25.5 cm], ending with a WS row.
Place marker at each end of last row.
Work a further 6 (6-6-6-12-12) rows in pat.
Shape top: Cast off 6 sts beg next 10 rows.
Cast off rem 34 (42-44-44-50-56) sts.
FINISHING
Pin garment pieces to measurements. Cover with a damp cloth, leaving cloth to dry.
Sew shoulder seams. Sew cast off edges of front extensions tog. Pin extensions along back neck edge, matching seam with center of Back. Sew in position.
Sew in sleeves, placing rows above markers along cast off sts at Back and Fronts to form square armholes. Sew side and sleeve seams.
Pockets (make 2).
With smaller needles, cast on 27 sts.
Work 6 rows in (K1. P1) ribbing as given for Back, ending with a WS row and inc 2 sts evenly across last row. 29 sts.
Change to larger needles and proceed as follows:
1st row: (RS). (Work 1st row of Panel Pat A for Left Front or Panel Pat B for Right Front) 4 times. K1.
2nd row: P1. (Work 2nd row of Panel Pat A for Left Front or Panel Pat B for Right Front) 4 times.
3rd row: (Work 3rd row of Panel Pat A for Left Front or Panel Pat B for Right Front) 4 times. K1.
4th row: P1. (Work 4th row of Panel Pat A for Left Front or Panel Pat B for Right Front) 4 times.
Panel Pat A or B is now in position.
Cont in pat until work from beg measures approx 6" [15 cm], ending with 6th row of pat. Cast off. Sew Pocket in position, noting directions of cables will match on Pockets and Fronts.
Your Recently Viewed Projects
Thanks for your comment. Don't forget to share!
naynago 4405752
Oct 29, 2020
I love the look of this cardigan and will be starting it next week. However, I am also having a problem choosing the correct size. The beginning of the pattern states (7 sizes) "XS, S, M, L, XL, 2/3 XL, 4/5 XL - 7, 7, 7, 8, 8, 9, 9, balls" The instructions state (6 sizes) "With smaller needles, cast on 93 (107-113-121-141-169) sts." I am confused. Please help! Thanks.
Lisa
Nov 05, 2020
This pattern is called Patons Long Cardigan with Pockets on the yarnspirations website and according to the pattern, the extra small and small are covered under the first size and are written as xs/s meaning the instructions for both are in the first size category, this is the link to the sweater- https//www.yarnspirations.com/on/demandware.static == /-/Sites-master-catalog-spinrite/default/dwb09c274 == 2/PDF/PAK0129-008569M.pdf
ejgalli 0523312
May 21, 2018
I copied this pattern in 2015 and am now attempting to make it. There was a chart with it which I do not have. Can I get it?
Kristina K
May 22, 2018
Hi ejgalli, you can find all the charts for this pattern directly under the portion of the pattern which reads "INSTRUCTIONS;" they are linked there. Happy knitting! -Editors of AllFreeKnitting
elizabethkratoska 6149271
Aug 02, 2017
I too have some concerns as to what number I should be following. I want to make an XL and like the other comments from others it lists 7 sizes with only 6 options to start the project with. Please clarify how this is to work, thank you.
Lisa
Mar 26, 2021
The first size is xs/s listed as one size not 2 in the pattern, so that reduces the options for sizing to 6.
Member 3801380
Feb 07, 2016
I have started with the back and Panel Pat A. The instructions say that Panel Pat A consists of 12 rows, but apparently we're only to repeat the first 4? (Although there's no 4th row listed in the pattern I presume it's the same as 2?) By repeating 4 rows I get a nice cable pattern (see picture), but it doesn't look anything like the picture. Can anyone help me understand how to read the pattern?
jemjamhsd 7677573
Sep 17, 2016
when shaping for the v-neck do I make the p2 as part of the 26 sts and it doesn't look right to do the p2 on the knit side?
Kathyvancamp 64201 95
Jan 11, 2016
I am having a problem with the left front -- like so many others. I am making the medium and had 76 stitches when I got to the underarm. Binding off 7 stitches brings that down to 69 then doing the other row with the purl 2 together for 6 times brings it down to 63 -- not 55. My left front ended up much much longer from armhole to shoulder. What can I do to this?
Kathyvancamp 64201 95
Jan 19, 2016
Was able to figure this my own. Ended up doing the purl 2 tog every other row until I reached the target number. Ended up being just the length I needed to match up with the back.
hamneggs
Oct 28, 2015
It looks like the XS and the S are the same measurements, so are probably combined in the instructions.
justlooking 251485 8
Oct 25, 2015
I haven't even started this cardigan yet as I can't determine what size I should be doing - I want to do the Large but it is the third within the parenthesis - I see 7 sizes offered but only SIX total sizes are listed when it comes to actually following the pattern instructions. I would hate to be following the wrong size. Please help I am so ready to start my winter knitting
lisadishart 303751 8
Jan 19, 2015
Hello there, I love this cardigan but I'm having trouble with the pattern! I am knitting it in 'L' size. Have done the back - fine. Now on left front, up to the cast off for armhole. For size 'L' I have 75 sts. after 1st row. Now have to reduce to 55 sts. by repeating next 2 rows X13 times in total !- Where have I gone wrong? I am so keen to wear this but I'm stuck!!
lisadishart 303751 8
Jan 21, 2015
Can anyone help me with my problem with this pattern??
Lisa
May 30, 2015
I think I can, I can see this decrease being an issue.Next row (WS). Work even in pat. Next row Pat to last 26 sts. P2tog. Pat to end of row. Rep last 2 rows (5-12-22-22-34) times more. (55-55-52-52 -54) sts rem. when you are working the second row there is a decrease of 1 stitch with P2tog each row, if you follow the directions you are decreasing 23 stitches in total after all repeats, the pattern actually states that you should reduce to 52 sts for the L size, remember its not just the amount of repeats, its the repeats plus the original 2 rows you did, which will result in a reduction of 23 stitches which is exactly what the pattern calls for for the L size. Hope this helps.
Katy W
Nov 07, 2014
Hi Editor JD..Thank you so much. It does help a lot. I feel like my mother in law. She used to rip out many things to make it right. Thank you so much again!!
Katy W
Nov 06, 2014
Hello Editor JD....when I look at the very beginning of the pattern under materials it gives sizes as:XS, S, M, L, XL, 2/3 XL, 4/5 XL. So I took the medium as the 3rd set of stitches. So which one is the Medium? If that is the case then I have to take out the finished back as well. I absolutely love this pattern and am making it for my sister in law for Christmas.It worked up beautifully too! Thank you so much for your answer and I await the next before I have to rip the back out.
Editor JD
Nov 07, 2014
Hi Katy W, The pattern is written for the smallest size available. In this case, it is the XS. In order to make a medium, you will be paying attention to the second number within parentheses. Hope this helps! -Editors of AllFreeKnitting
Katy W
Nov 03, 2014
I need help quickly because this is a gift I am giving. Is there a mistake in the pattern for the left front? The stitches remaining are supposed to be 55 stitches. But if you only repeat for 5 times I have 63 stitches not 55. This also throws off the stitch count for the next set of decreases. It calls for 42 stitches to be left. Thank you for any help You can give me.
Editor JD
Nov 04, 2014
Hi Katy W, We just checked the pattern, and it doesn't appear that any of the instructions are incorrect. While you are shaping the armhole and v-neck, you should have ended up with 61 stitches (per the medium's instructions). You should have only had to decrease 6 times total to get to the 55 stitches required to continue. You must have made a technical error before this section. Hope this helps! -Editors of AllFreeKnitting
Katy W
Nov 03, 2014
I cannot get the left front to match the back The stitches on the left front when I reread it will not match if done by the way it is written Sizes M L XL XL XL only Next row WS Work even in pattern Next row Pattern to last stitches P tog Pattern to end of row Rep last rows - - - - times more - - - - sts rem If you follow it for the medium for repeats then it does not bring it down to the stitches I had to do the repeat for repeats to get it to the stitches I followed the last set of repeats and it does come down to the stitches but then there are not enough stitches when you get to the shoulder shaping By following it the armhole is longer than the back I need help quickly because this…Read More is a gift I am giving
Di280566 5297692
Jan 09, 2015
My hubby is having the exact same problem here. He has made one for me at xl size which turned out ok but this is being made for a friend who liked mine very much. She is a M. I too would like help quickly please. Thank you
vtrapped 5729078
Sep 29, 2014
I can't figure out what c4b,t3b is. Is it the cable stitch? I have ripped many times.
Editor JD
Oct 01, 2014
Hi vtrapped 5729078, Please see the updated abbreviations list above. Happy Knitting! -Editors of AllFreeKnitting
shlbycindy 0508672
Oct 01, 2014
c4b means to cable 4 to the back. t3b means to twist 3 to the back. This is the cable stitch. knittinghelp.com has a tutorial on how to do these stitches.
hamneggs
Oct 22, 2014
C4B = Slip next 2 stitches onto a cable needle and leave at back of work. K2, then K2 from cable needle. T3B = Slip next stitch onto a cable needle and leave at back of work. K2, then P1 from cable needle
Ddipsy
Sep 08, 2014
This pattern may look difficult, but it is well written. Set aside enough time to read and re-read the pattern before you begin. Then, just stick to the sweater's pattern piece you will be working on. Don't overwhelm yourself by trying to picture the entire sweater according to the pattern. The sweater will come together as you work each piece. I highly recommend this pattern! This sweater is going to be a birthday gift to my mother.
Report Inappropriate Comment
Are you sure you would like to report this comment? It will be flagged for our moderators to take action.
Thank you for taking the time to improve the content on our site.