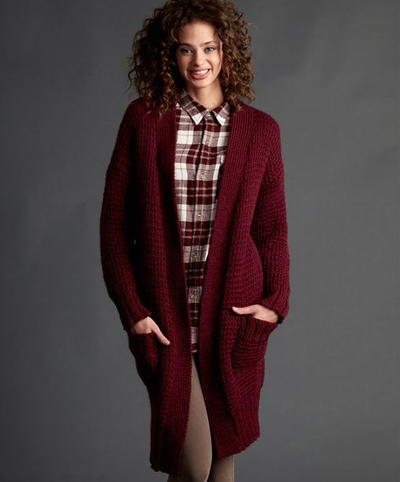
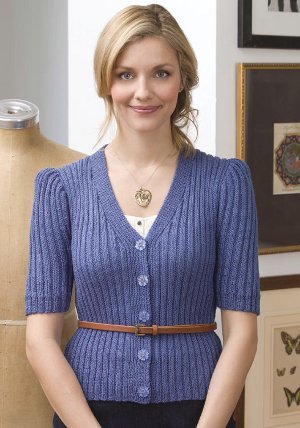
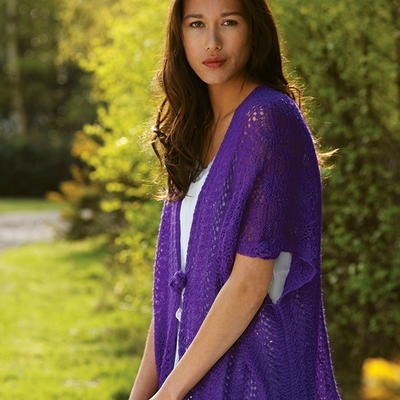
Charisma Lace Cardigan

The Charisma Lace Cardigan is a real beauty. Knitting a cardigan doesn't get much better than this. The deep violet hue mixed with the light and lacy yarn make this free knitting pattern a feminine standout. The loose drape makes this cardigan ideal for both casual and dressier events. The relaxed look is incredibly popular these days, so you will be right on trend when you wear this knitted cardigan. An easy and versatile design will have you wondering why you didn't make this beauty sooner. Plus, the subtle flower motif found throughout this piece makes it perfect for spring.

Knitting Needle Size2 or 2.75 mm, 4 or 3.5 mm
Yarn Weight(0) Lace (33-40 stitches to 4 inches). Includes crochet thread.
Gauge24 sts and 32 rows to 10 x 10cm / 4 x 4in in patt using 3.5mm needles after pressing
Finished SizeSizing: One size Width: 76cm (30in) Around chest: 152cm (60in) Length: 66cm (26in) Armhole depth: 28cm (11in)
Materials List
- 4 x 50g Artesano Alpaca Silk Lace - 1142 Russian Purple
- 3.5mm needles, 2.75mm needles (for flowers)
- 12 beads for center of flowers
- Blunt ended needle for sewing up and working chain st
Cardigan Panel (make 4)
Using 3.5mm needles, cast on 100 sts.
Knit 2 rows.
Cont in patt as folls:
Row 1: Sl1k, k to last st, k1 tbl.
Row 2: Sl1k, k4, p to last 5 sts, k4, k1 tbl.
Row 3: Sl1k, k4, *(k2tog) x 3, (yon, k1) x 6, (k2tog) x 3, rep from *to last 5 sts, k4, k1 tbl.
Row 4: As Row 1. These 4 rows form patt.
Work another 49 patt reps.
Knit 4 rows.
Cast off.
To Finish Off
Press or block to measurements given in schematic. Using fine back st, join 2 pieces at cast off sts to form Shoulder and Sleeve seams (twice). Join 2 side edges to form centre back from bottom edge to 12.5cm (5in) below shoulder seam. Join side edges from bottom edge for 38cm (15in). Press all seams.

Flowers (make 12)
Using 2.75mm needles, cast on 10 sts.
Row 1: Knit
Row 2: Purl
Row 3: Knit into front and back of every st. 20 sts.
Row 4: As Row 2.
Row 5: As Row 3. 40 sts.
Row 6: As Row 2.
Row 7: As Row 3. 80 sts.
Row 8: Purl.
Cast off leaving long tail.
Shape flower to form a spiral and secure. Sew bead to centre. Stitch 2 flowers to sides and back seams and one to bottom fronts. Sew 1 flower to Sleeve ends of shoulder seams. Position flowers on each front approx 43cm (17in) from bottom edge. Work chain stitch cord and attach to right front edge under flower to form loop for fastening.
Abbreviations
- k1tbl
- knit 1 st through back loop
- Sl1k
- slip 1 st knitwise
- yon
- yarn over needle
Read NextDownton Abbey Cardigan
Your Recently Viewed Projects
Thanks for your comment. Don't forget to share!
shegnada 2624886
Dec 18, 2018
I am loving the stitching but am afraid that I'll put it together wrong. I am apparently knitting four squares that when seen together have a lovely neckline in front which I don't see how to get.in the schematic the top front angles, is that all that is needed? And where did the angle s come from? I don't see how blocking or pressing is going to get rid of the front corners.
shegnada 2624886
Dec 18, 2018
The rating shouldn't show. I ticked that I hadnt knit yet. I'm expecting to give a five if I can figure it out.
Lisa
Jan 15, 2022
You are knitting 4 identical panels, sewing the cast off edges together to create the shoulders, then sewing a seam down the middle back and both sides to create the sweater. The blocking is to ensure all the pieces come out to the same size before sewing, the collar/neck is simply folded back at the neck line.
DiamondLou
Feb 04, 2018
A picture of the model with the flowers (or a close-up) would have helped...
lawrenceljb 615621 0
Feb 24, 2017
Why is there no print option for this pattern
DiamondLou
Feb 04, 2018
There is ) Scroll down to the end of the pattern, you'll see a colored band with Facebook, Twitter, etc. Click on the blue one that says More...
Member 6279341
Apr 09, 2018
Thanks for that, DiamondLou! I was about to do it the hard way as I haven't reinstalled the add-on I usually use since my laptop crashed dramatically lol )
rolandese 0739257
Jun 08, 2016
Can the back be done in one piece?
Lisa
Jul 14, 2023
Yes, just double the cast on. I would suggest knitting it as two panels, following the directions exactly, the not so noticeable seam at the back is giving the garment some shape and stability. My other suggestion is to use a three needle bind off for the shoulders. Hope this helps someone, happy knitting.
quanahs 5032097
May 04, 2016
I am in love with the pretty little cardi. Its so sweet and the perfect sweater for Spring or in an air conditioned office. Its simple boxy shape means there is no fussing with increases and decreases. Plus all four panels are identical, though I think I may knit the back in one piece to make a seamless back. I think this would work well as a beach coverup too.
gran741
Apr 01, 2016
love the looks of this. But, cannot read the schematic. what are he panel measurements?
KathrynAllison
Apr 05, 2016
Hello gran741! The measurements for the schematic are as follows the bottom is 152 cm (60 in), the middle measurement is 43 cm (17 in), the top left side is 28 cm (11 in), the bottom right side is 38 cm (15 in), the horizontal measurement on the left side is 38 cm (15 in), and the upper right measurement is 12.5 cm (5 in). Hope this helps! -Editors of AllFreeKnitting
Report Inappropriate Comment
Are you sure you would like to report this comment? It will be flagged for our moderators to take action.
Thank you for taking the time to improve the content on our site.