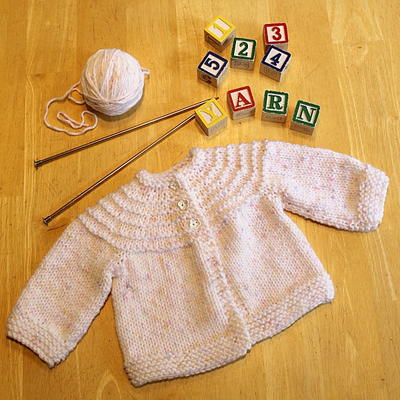
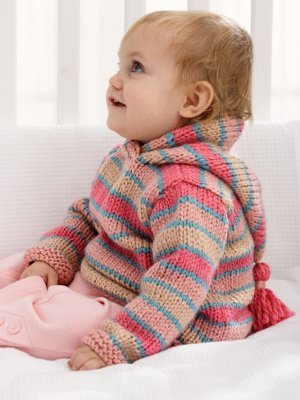
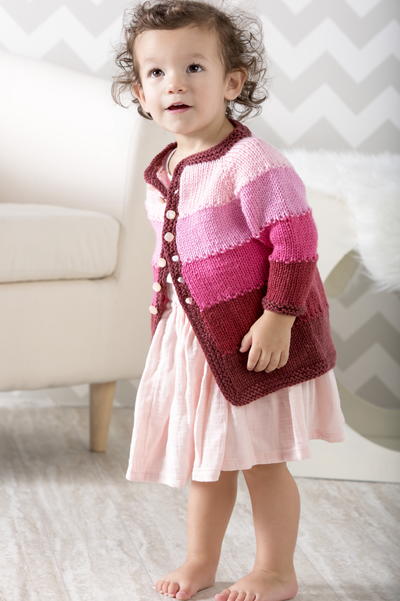
Ombre Cardigan

The Ombre Cardigan is a beautiful free knitting pattern for any little lady in your life. Featuring different shades of pink and red yarn, this lovely design is knit in one piece from the top down. The ombre effect is right on trend and the dainty buttons give this easy knit baby cardigan the perfect finishing touch. Whether you knit this for your own child or for a loved one, you will surely enjoy the easy-to-understand pattern and the adorable end result. Making your own handmade garments is a great way to expand your knitting skills and express your creativity, so get to work today and work up this adorable ombre knit cardigan.
NotesThis cardigan is knit in one piece from the top down.

Knitting Needle Size8 or 5 mm, Circular Knitting Needles, Double-Pointed Knitting Needles (DPNs)
Yarn Weight(4) Medium Weight/Worsted Weight and Aran (16-20 stitches to 4 inches)
Gauge18 sts x 25 rows = 4” in Stockinette St. Save time, check your gauge.
Finished Size12 (18, 24) months, Chest: 20 (22, 24)”
Materials List
- Premier® Yarns D.I.Y. Gradient Yarn (100% Anti-pilling Acrylic; 200g/360 yds) - #1046-01 Pink – 1 set
- US Size 8 (5 mm) 24” circular needle and set of 4 double pointed needles or size needed to obtain gauge
- Tapestry needle
- Stitch markers
- 5 (6, 7) buttons ½” diameter
Stitch Guide
Garter Stitch in rows
Knit every row.
Garter Stitch in the round
Rnd 1: Knit.
Rnd 2: Purl.
Rep Rnds 1-2 for pattern.
Stockinette Stitch in rows
Row 1 (RS): Knit.
Row 2 (WS): Purl.
Rep Rows 1-2 for pattern.
Cardigan
With lightest color and circular needle, cast on 59 sts.
Row 1 (WS): P10, pm, p1, pm, p6, pm, p1, pm, p23, pm, p1, pm, p6, pm, p1, pm, p10.
Row 2 – Increase Row (RS): *Knit to marker, M1R, sl marker, k1, sl marker, M1L; rep from * 3 more times, knit to end – 8 sts increased.
Row 3: Purl.
Rep last 2 rows 4 (5, 6) more times – 99 (107, 115) sts.
Change to next darker color.
Next row (RS): *[K1, p1] to marker, M1R, sl marker, k1, sl marker, M1L; rep from * 3 more times, [k1, p1] to end – 107 (115, 123) sts.
Next row: Rep Row 3.
Rep Rows 2 and 3, 3 (4, 5) more times – 131 (147, 163) sts.
Next row (RS): Knit.
Next row: Purl.
Next row: Rep Row 2 – 139 (155, 171) sts.
Next row: Purl.
Divide Body and Sleeves
Change to next darker color (middle color).
Next row (RS): [K1, p1] to marker, sl next 28 (32, 36) sts to holder for sleeve removing markers, cast on 1 st to bridge gap, [p1, k1] across back to marker, sl next 28 (32, 36) sts to holder for sleeve removing markers, cast on 1 st to bridge gap, [p1, k1] to end – 85 (93, 101) sts.
Body
Work 11 (13, 15) more rows in Stockinette stitch.
Change to next darker color.
Next row (RS): *K1, p1; rep from * to last st, k1.
Work 11 (13, 15) more rows in Stockinette stitch.
Change to darkest color.
Next row (RS): *K1, p1; rep from * to last st, k1.
Work 9 (11, 13) more rows in Stockinette stitch.
Work 6 rows in Garter stitch.
Bind off.
Sleeves
Place 28 (32, 36) sts on 3 double pointed needles.
Join middle color yarn at underarm.
Rnd 1: *K1, p1; rep from * to end, pick up and knit 2 sts at underarm edge, placing marker between picked up sts for end of rnd – 30 (34, 38) sts.
Rnd 2 – Decrease Rnd: K1, ssk, knit to last 3 sts, k2tog – 2 sts decreased.
Continue in Stockinette stitch, repeating Decrease Rnd every 4th rnd 5 (6, 7) more times – 18 (20, 22) sts.
AT THE SAME TIME, change to next darker color when 12 (14, 16) rnds of middle color have been worked, working first rnd of new color as *k1, p1; rep from * to end.
Change to darkest color and work 6 rnds in Garter stitch.
Bind off loosely. Rep for other sleeve.
Front and Neck Edging
Mark position for 5 (6, 7) buttonholes along left front edge, placing top buttonhole at neck edge, and spacing remaining buttonholes about 1¼” apart.
With circular needle and darkest color, starting at lower right front corner, pick up and knit sts along front and neck edges at the rate of 2 sts for every 3 rows and 1 st for every cast on st.
Row 1 (WS): Knit.
Row 2 – Buttonhole Row (RS): Knit to 1 st before right neck corner, M1R, k1, M1L at corner, knit to left front neck corner, M1R, k1, M1L, knit to end working [yo, k2tog] at each marked buttonhole position.
Row 3: Knit.
Row 4: Knit, working [M1R, k1, M1L] at front neck corners.
Row 5: Knit.
Bind off.
Finishing
Sew buttons to right front edging opposite buttonholes.
Weave in ends, closing up any gaps at underarms.
Block gently.
Abbreviations
- k2tog
- knit 2 sts together
- M1L
- insert left needle from front to back under horizontal strand of yarn lying between st just worked and next st, knit this st through the back loop (1 st inc’d)
- M1R
- insert left needle from back to front under horizontal strand of yarn lying between st just worked and next st, knit or purl this st through the front loop (1 st inc’d)
- pm
- place marker
- rnd(s)
- round(s)
- sl
- slip
- ssk
- slip, slip, knit
- st(s)
- stitch(es)
- yo
- yarn over
What do you love most about baby knitting patterns?
Read NextTiny Stripes Cardigan and Vest
Your Recently Viewed Projects
Thanks for your comment. Don't forget to share!
Hippie Chick
Mar 08, 2017
Ooooo, what a beautiful sweater. It looks like the colors of ice cream. I havent knitted anything in a while. I have been focusing mostly on my crochet skills lately, but this makes me want to search for my knitting needles and make a trip to the yarn store in hopes that they have the D.I.Y. gradient yarn that looks almost good enough to eat.
oldyooper
Mar 06, 2017
Why do I keep seeing this pattern in the free CROCHET emails? Beautiful pattern, but I don't knit....
KathrynAllison
Mar 06, 2017
Hello oldyooper, there are instances when we cross-promote both knit and crochet patterns since many of our readers are interested in both crafts. Thank you for your comment! -Editors of AllFreeKnitting
Report Inappropriate Comment
Are you sure you would like to report this comment? It will be flagged for our moderators to take action.
Thank you for taking the time to improve the content on our site.